
In the ever-evolving landscape of virtual communication, Google Meet has emerged as a powerhouse for remote collaboration and meetings. As professionals, educators, and individuals increasingly rely on this platform, the need to efficiently capture and preserve valuable discussions becomes paramount. This comprehensive guide aims to empower you with the knowledge and skills necessary to master the art of recording Google Meet sessions. So without any further delays, let’s directly get into the steps on how to record Google Meet.
Steps to Record Google Meet Virtual Meeting
To capture a Google Meet session, follow these steps:
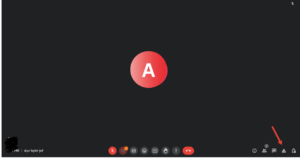
1. Launch or join a Google Meet session on your computer.
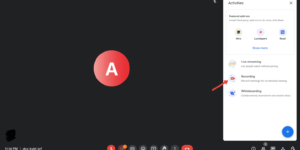
2. Locate the Activities button at the bottom right corner and click on it, then select Recording.
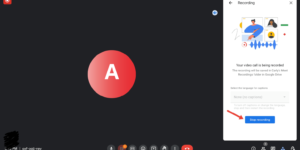
3. Choose your desired language for meeting captions, if applicable.
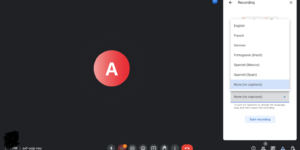
4. Note that captions might be delayed after the recording is saved to Google Drive.
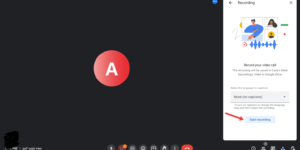
5. initiate the recording by clicking Start Recording.
6. Confirm the start in the subsequent pop-up window by clicking Start.
7. Await the commencement of the recording; participants receive notifications for recording onset and conclusion.
8. Remember that recordings are limited to 8 hours, after which they automatically cease.
Take the following steps in case you want to terminate the recording.
- To terminate the recording, access Activities again, select Recording, and then Stop Recording.
- In the pop-up window, confirm the termination by clicking Stop recording.
- Optionally, the recording halts automatically when all participants exit the meeting.
Now that you are aware of the steps to record Google Meet, let’s understand some of the basics of Google Meet and how it fulfills the demand for users.
What is Google Meet & How it Works?

In the realm of virtual communication, familiarity with the fundamental features and functionalities of Google Meet is the first step towards mastering the art of recording meetings. No matter which software you are using or accessing its features, it is important to understand the software to be able to benefit from it completely. Let’s understand how Google Meet works and what purposes it can serve.
Overview of Google Meet
Google Meet is a powerful video conferencing platform designed for seamless communication and collaboration. Begin by understanding the interface, from accessing meetings to navigating the various controls. Explore the layout of the meeting screen, identify essential buttons, and familiarize yourself with the options available to participants.
Things to Remember Before Recording Google Meeting
Now that you’ve gained a solid understanding of the basic features of Google Meet, it’s time to delve into the crucial aspect of preparing for recording. Proper preparation ensures a smooth recording process and enhances the overall quality of your virtual meetings. Let’s understand the essential steps to optimize your Google Meet settings and introduce recommended tools and software for seamless recording.
1. Optimize Your Google Meet Settings for Recording
Before you hit the record button, it’s essential to fine-tune your Google Meet settings for optimal recording outcomes. Explore the settings menu to customize video and audio preferences, adjust screen sharing options, and configure advanced settings that directly impact the recording experience. Understanding these settings will empower you to tailor your virtual meetings to specific needs, ensuring that the recording captures exactly what you intend.
2. Recommended Tools and Software for Seamless Recording
While Google Meet offers built-in recording features, exploring external tools and software can provide additional flexibility and functionalities. From screen recording tools to dedicated meeting capture solutions, discover options that suit your requirements and preferences.
Best Practices for Google Meet Recording
Having mastered the essential steps in recording Google Meet sessions, it’s crucial to delve into best practices that elevate the quality and effectiveness of your recordings. This section will provide insights into optimizing your recording experience, ensuring clarity, professionalism, and enhanced collaboration.
Tips for Ensuring High-Quality Recordings
1. Lighting and Camera Placement
- Guidance on positioning lighting for clear visibility
- Recommendations for optimal camera placement to enhance video quality
2. Microphone Setup
- Selecting and configuring microphones for crisp and clear audio
- Minimizing background noise for an improved recording experience
3. Internet Connection Considerations
- Understanding the impact of internet speed on recording quality
- Tips for optimizing your internet connection during Google Meet sessions
Managing and Accessing Recorded Meetings
After successfully recording your Google Meet sessions, the next crucial step is efficiently managing and accessing the recorded content. Let’s understand the necessary insights to organize, share, and retrieve your recordings seamlessly.
1. Locate Recorded Meetings in Google Meet
A. Accessing the Recording Hub
- Navigate to the recording hub within Google Meet
- Understand the layout and organization of recorded meetings
B. Search and Filter Functionality
- Utilize search and filter options for quick access
- Sort and categorize recorded meetings for better organization
2. Options for Sharing Recorded Content
A. Sharing Within Google Meet
- Directly share recorded meetings with participants
- Explore the permissions and controls for shared recordings
B. External Sharing Options
- Generate shareable links for broader accessibility
- Adjust privacy settings when sharing recordings externally
3. Archive and Backup Recorded Meetings
A. Importance of Archiving
- Understand the benefits of archiving recorded meetings
- Create an archive system for long-term storage and retrieval
B: Backing Up for Redundancy
- Implement backup strategies to prevent data loss
- Utilize cloud storage or external drives for secure backups
Troubleshooting Common Recording Issues
While recording Google Meet sessions can significantly enhance your virtual collaboration experience, encountering technical challenges is not uncommon. This section will equip you with troubleshooting strategies to address common recording issues, ensuring a smooth and effective recording process.
Unable to Initiate Recording
- Ensure that you have the necessary permissions to record the meeting.
- Verify the host’s settings and permissions for participants.
- Confirm that you are using a supported browser for recording.
- Update your browser to the latest version to address compatibility issues.
Poor Video or Audio Quality
- Assess your internet connection for stability and speed.
- Consider switching to a wired connection for improved reliability.
- Verify that your camera and microphone are configured correctly.
- Adjust settings to enhance video and audio quality during recording.
Recording Interrupted or Unavailable
- Check for updates to ensure you are using the latest version of Google Meet.
- Updates may address bugs or glitches affecting the recording feature.
- Monitor your device’s CPU and memory usage during recording.
- Close unnecessary applications to free up system resources.
Alternatives to Built-in Recording
While Google Meet offers built-in recording features, exploring alternative solutions can provide additional functionalities and flexibility. Let’s explore some of the third-party platforms that can help with the screen recording in case you face any difficulties with the recording feature of Google Meet.
Screen Recording Software
I. BS Studio
1. Multi-Platform Support: OBS Studio is compatible with Windows, macOS, and Linux, catering to a diverse user base.
2. Customizable Scenes and Sources: Create dynamic recording setups with customizable scenes and sources, allowing you to capture specific elements during your Google Meet sessions.
3. Flexible Recording Options: OBS Studio offers various recording options, including recording the entire screen or specific windows, providing flexibility based on your recording needs.
4. High-Quality Output: Capture meetings in high resolution and frame rates, ensuring a clear and professional recording output.
5. Real-Time Scene Switching: Seamlessly switch between different scenes or layouts during your recording, enhancing the overall visual experience.
II. Camtasia
1. Screen and Audio Recording: Camtasia allows users to capture both the screen and audio simultaneously, providing a comprehensive recording experience.
2. Professional Editing Tools: Edit recorded content with precision using Camtasia’s array of video editing tools, including cut, trim, and add effects to enhance the final output.
3. Cursor Effects: Highlight and emphasize cursor movements, clicks, and interactions during your Google Meet recordings for clearer communication.
4. Interactive Quizzes and Annotations: Enhance engagement by adding quizzes, annotations, and callouts directly to your recordings, making them more interactive and informative.
5. Multi-Track Timeline: Easily manage and organize your recorded content using Camtasia’s multi-track timeline, allowing for seamless editing and synchronization.
III. Loom
1. Instant Recording and Sharing: Loom allows users to instantly start recording and sharing their content seamlessly, reducing the time between capturing and distributing information.
2. Cloud Storage: All recordings are stored securely in the cloud, eliminating the need for local storage and providing accessibility from anywhere with an internet connection.
3. Real-Time Webcam and Screen Capture: Loom enables users to capture both webcam footage and screen activity simultaneously, providing a versatile recording experience.
4. Commenting and Annotations: Enhance collaboration by adding comments, annotations, and reactions directly to your recordings, fostering a more interactive viewing experience.
5. Team Collaboration: Loom offers features for team collaboration, allowing multiple users to contribute to a shared library of recordings for improved teamwork.
IV. Snagit
1. All-in-One Capture: Snagit allows users to capture both screenshots and recordings seamlessly, consolidating various multimedia capture needs into a single platform.
2. Advanced Editing Tools: Edit your recordings with precision using Snagit’s comprehensive editing toolkit, which includes annotations, callouts, and effects for a polished final product.
3. Animated GIF Creation: Convert sections of your recordings into animated GIFs for concise and engaging content.
4. Integration with Camtasia: Snagit seamlessly integrates with Camtasia, allowing users to transfer recordings for further advanced editing if needed.
5. Quick Sharing Options: Share your recordings directly from Snagit to various platforms, making it easy to distribute content to your team or audience.
V. CloudApp
1. Screen and Webcam Recording: Capture both your screen and webcam simultaneously for a comprehensive recording experience.
2. Annotated Screenshots: Capture screenshots and annotate them with arrows, shapes, and text to convey information more effectively.
3. GIF Creation: Convert segments of your recordings into animated GIFs for concise and engaging visual communication.
4. Instant Sharing: CloudApp allows for the instant sharing of recordings through links, making collaboration efficient and hassle-free.
5. Collaboration Hub: The platform offers a centralized hub for managing and collaborating on shared content, fostering teamwork.
Frequently Asked Questions (FAQs)
1. How do I check if recording is enabled in my Google Meet account?
To verify if recording is enabled, follow these steps:
- Open Google Meet and start or join a meeting.
- Look for the recording icon in the meeting controls.
- If you don’t see the recording icon, check with the meeting host or administrator to ensure recording permissions are granted.
2. Can I record Google Meet sessions on a mobile device?
As of the latest updates, Google Meet’s built-in recording feature is primarily available on desktop versions. However, some third-party apps may offer mobile recording capabilities. Check your app store for options, and always consider user reviews and compatibility.
3. Are there limitations on the duration of a recorded Google Meet session?
Google Meet recordings are subject to time limitations based on your Google Workspace edition. Typically, recordings may have a duration limit, so it’s crucial to be aware of your plan’s specifications. Explore alternative recording solutions for longer sessions if needed.
4. How can I share a recorded Google Meet session with participants who couldn’t attend?
After recording, you can share the session by providing participants with access to the recording link. Within Google Meet, locate the recording hub and find the share options. Ensure participants have the necessary permissions to view the recording.
5. Can I edit a recorded Google Meet session?
While Google Meet’s built-in features are limited in terms of editing, you can use external video editing software for more advanced editing needs. Download the recorded session, edit as required, and then share the finalized version with participants.
Conclusion
Mastering the art of recording Google Meet sessions is a valuable skill that enhances collaboration and information retention. From understanding the basics and preparing for recording to troubleshooting issues and exploring alternative solutions, this comprehensive guide has equipped you with the knowledge needed for a seamless virtual meeting experience.
Remember, Google Meet’s built-in recording features provide a solid foundation, but exploring third-party tools can offer additional functionalities tailored to your needs. As you navigate through the evolving landscape of virtual meetings, prioritize best practices for high-quality recordings and efficient management of recorded content.