In an era where visual communication reigns supreme, the iPhone screen recording feature stands as a powerful tool for capturing and sharing moments, tutorials, and important information. Whether you’re a digital content creator, educator, or simply looking to share your experiences with friends and family, mastering iPhone screen recording opens up a world of possibilities.
From understanding the duration limits of screen recording to exploring advanced tips and troubleshooting common issues, this phone guide will equip you with the knowledge and skills needed to leverage this feature effectively. So without any further delays, let’s directly get into our topic.
How Long Can You Screen Record on iPhone?
There’s no maximum duration to screen recording on iPhones. The duration of screen recording on an iPhone largely depends on various factors such as storage space, and the resolution and frame rate settings selected for the recording. By default, iPhones allow users to record up to two hours of continuous screen recording.
It’s essential to consider the storage capacity of your iPhone when planning longer screen recording sessions, as recording high-resolution videos can quickly consume storage space. Also, recording at higher frame rates or resolutions may result in larger file sizes, which can further impact the recording duration. To maximize screen recording duration, users can optimize their iPhone’s storage by deleting unnecessary files or apps and adjusting recording settings to prioritize efficiency without compromising on quality.
How to Screen-Record on iPhone?
Screen recording on an iPhone is a straightforward process that allows users to capture anything happening on their device’s screen. Follow these simple steps to initiate screen recording on your iPhone:
1. Access Control Center: Begin by accessing the Control Center on your iPhone. Depending on your device model, you can do this by swiping down from the top-right corner (iPhone X and later) or swiping up from the bottom of the screen (iPhone 8 and earlier).
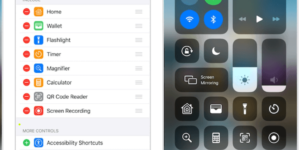
2. Locate Screen Recording Button: In the Control Center, you’ll find the screen recording button, represented by a circle with a solid circle inside. If you don’t see the screen recording button, you may need to customize your Control Center settings to include it.
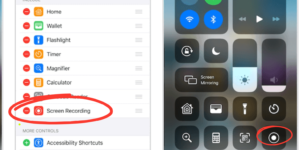
3. Start Screen Recording: Once you’ve located the screen recording button, tap on it to initiate the screen recording process. You may see a countdown timer appear, indicating when the recording will start.
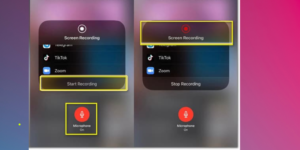
4. Confirm Recording: After tapping the screen recording button, you may be prompted to confirm your action. Tap “Start Recording” to confirm and begin capturing your screen.
5. Access Recording Controls: Once the recording has started, you’ll see a red bar at the top of the screen, indicating that the recording is in progress. You can access additional recording controls by tapping on this red bar.
6. Stop Screen Recording: To stop the screen recording, simply tap on the red bar at the top of the screen and select “Stop” from the prompt that appears. Alternatively, you can return to the Control Center and tap the screen recording button again to stop the recording.
Troubleshooting Common Screen Recording Issues
While iPhone screen recording is a powerful feature, users may encounter occasional issues that disrupt their recording sessions. In this section, we’ll address some common screen recording issues and provide troubleshooting tips to help you resolve them:
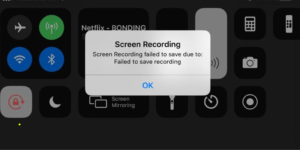
1. Recording Interruptions
If your screen recording is abruptly interrupted or stops unexpectedly, it may be due to insufficient storage space, low battery, or background processes consuming system resources. Ensure that your iPhone has ample storage space, is adequately charged, and closes unnecessary apps or processes before initiating a recording session.
2. Audio Quality Issues
Poor audio quality in screen recordings can result from various factors, such as background noise, microphone positioning, or incompatible audio settings. To improve audio quality, minimize background noise, ensure the microphone is positioned correctly, and adjust audio settings to prioritize clarity.
3. Frame Drops or Lag
If your screen recording exhibits frame drops, stuttering, or lag, it may be due to high CPU usage, background processes, or insufficient system resources. Close unnecessary apps, disable background downloads or updates and reduce recording settings such as resolution or frame rate to alleviate the strain on your iPhone’s resources.
4. Screen Flickering or Artifacts
Screen flickering or visual artifacts in screen recordings can be caused by display issues, software glitches, or incompatible recording settings. Try adjusting display settings, updating your iPhone’s software to the latest version, or experimenting with different recording settings to mitigate screen flickering or artifacts.
5. Recording Playback Issues
If you encounter playback issues with your screen recordings, such as audio-video synchronization problems or playback stuttering, try using a different media player or editing app to playback the recording. Additionally, ensure that your iPhone’s software is up-to-date and compatible with the recording format.
6. Inability to Start Recording
If you’re unable to initiate a screen recording on your iPhone, double-check that screen recording is enabled in your Control Center settings and that your device’s software is up-to-date. If the issue persists, try restarting your iPhone or resetting the device settings to resolve any software glitches.
Maximizing Screen Recording Duration
While iPhones offer a default screen recording duration of up to two hours, maximizing the recording duration requires careful consideration of various factors. Here are some tips to help you make the most out of your screen recording sessions:
1. Optimize Storage Space
Before initiating a screen recording session, ensure that your iPhone has sufficient available storage space. Delete unnecessary files, apps, or media to free up space and prevent interruptions during recording.
2. Adjust Recording Settings
Take advantage of the recording settings available on your iPhone to optimize the recording duration. Consider lowering the resolution or frame rate of the recording, especially if you don’t require high-definition quality for your content. This can help reduce file size and prolong the recording duration.
3. Limit Background Processes
Close unnecessary apps and background processes that may consume system resources and impact the recording duration. This includes pausing or disabling background downloads, updates, or notifications that could interrupt the recording.
4. Monitor Battery Life
Screen recording can be resource-intensive and may drain your iPhone’s battery quickly, especially for longer recording sessions. Ensure that your iPhone is adequately charged or connected to a power source to prevent interruptions due to low battery.
5. Consider External Factors
Take into account external factors such as ambient temperature and device temperature, as prolonged screen recording sessions may cause your iPhone to heat up. Avoid recording in extreme temperatures or direct sunlight to prevent overheating issues.
By implementing these strategies, you can optimize your iPhone screen recording sessions to maximize duration and ensure uninterrupted capture of your screen content. Whether you’re recording tutorials, gameplay, or presentations, these tips will help you make the most out of your screen recording experience.
Advanced Screen Recording Tips and Tricks
Taking your iPhone screen recording skills to the next level involves mastering advanced techniques and leveraging hidden features to enhance your recording experience. In this section, we’ll explore some advanced tips and tricks to help you elevate your screen recording game:
1. Utilize External Microphones
For high-quality audio recordings, consider using an external microphone instead of relying on the iPhone’s built-in microphone. This can significantly improve the audio clarity and eliminate background noise, especially in noisy environments or during interviews and presentations.
2. Experiment with Different Recording Apps
While the built-in screen recording feature on iPhone is robust, exploring third-party recording apps can offer additional features and customization options. Look for apps that allow you to adjust recording settings, add annotations or overlays, and edit recordings directly within the app.
3. Create Customizable Control Center Shortcuts
Customize your iPhone’s Control Center to include shortcuts for specific screen recording settings or apps. This allows you to access frequently used recording settings or launch recording apps with just a tap, streamlining your workflow and saving time.
4. Explore Editing Tools and Effects
After recording your screen, take advantage of editing tools and effects to enhance your recordings further. Trim or crop recordings to remove unwanted sections, add text annotations or captions for clarity and apply filters or effects to enhance visual appeal.
5. Utilize External Displays or AirPlay
Connect your iPhone to an external display or use AirPlay to mirror your screen onto a larger display. This allows you to record presentations, demonstrations, or gameplay with ease while providing a better viewing experience for your audience.
6. Enable Guided Access for Restricted Recording
If you’re recording sensitive content or demonstrations that require restricted access to certain areas of your screen, enable Guided Access mode. This feature allows you to limit access to specific areas of the screen or disable touch input during recording, ensuring privacy and security.
Conclusion
iPhone screen recording offers a versatile tool for capturing and sharing content effortlessly. By mastering the techniques outlined in this guide, you can elevate your recording skills and unleash your creativity. As technology evolves, so will the capabilities of iPhone screen recording, presenting endless possibilities for content creation. Whether you’re a beginner or a seasoned user, embrace the potential of screen recording on your iPhone and explore new avenues for sharing your story.